


Is your air conditioner short cycling, freezing up, or not delivering cool air? Your AC sensor, or thermistor, is often the culprit. This guide walks you through locating, diagnosing, and fixing it, plus knowing when it's time to call for backup.
An AC sensor is essential for your HVAC system's performance. Often called a thermistor, this small electronic part monitors temperature at the evaporator coil and relays data to your system’s control board. When it fails, even slightly, it can trigger a cascade of inefficiencies. Expect short cycles, rising energy bills, or in worse cases, icing or compressor damage. That’s why testing and repairing or replacing it promptly is so critical.
Stick with me, I'll walk you step-by-step through identifying the sensor, testing it with a multimeter, and performing quick fixes. If nothing helps, you’ll know exactly when to call a licensed HVAC pro. Plus, if you're in Las Vegas, we'll connect you with trusted local service.
Need help with other AC issues? Don’t miss our AC Troubleshooting Guide for common problems and DIY fixes.
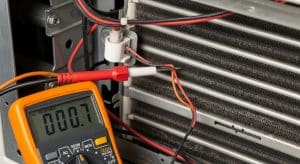 e evaporator coil. Changing resistance with temperature, it feeds real-time data to the control board, which then turns compressors or fans on and off to maintain your desired indoor temperature.
Without accurate readings, your AC can’t control its cycles efficiently. An erratic or failing sensor may misreport temperatures, triggering overheating, short cycling, or even continuous operation. That leads to premature wear on components, poor comfort control, and inflated energy bills. Not to mention, in some models, continuous cooling might cause coil freeze-up or shutdowns driven by system safety protocols.
Placement is everything. The sensor is typically installed just above the evaporator coil fins, about ¼ inch away, not touching the coil, to deliver accurate readings while avoiding direct contact. Misplacement or loose wiring means inaccurate feedback to your system, making the sensor a fine yet vital component.
Looking for additional quick fixes for cooling issues? Check out AC Not Cooling? Here Are 5 DIY Fixes You Should Try First.
e evaporator coil. Changing resistance with temperature, it feeds real-time data to the control board, which then turns compressors or fans on and off to maintain your desired indoor temperature.
Without accurate readings, your AC can’t control its cycles efficiently. An erratic or failing sensor may misreport temperatures, triggering overheating, short cycling, or even continuous operation. That leads to premature wear on components, poor comfort control, and inflated energy bills. Not to mention, in some models, continuous cooling might cause coil freeze-up or shutdowns driven by system safety protocols.
Placement is everything. The sensor is typically installed just above the evaporator coil fins, about ¼ inch away, not touching the coil, to deliver accurate readings while avoiding direct contact. Misplacement or loose wiring means inaccurate feedback to your system, making the sensor a fine yet vital component.
Looking for additional quick fixes for cooling issues? Check out AC Not Cooling? Here Are 5 DIY Fixes You Should Try First.
Replacing the sensor yourself is affordable and rewarding, especially if you’re comfortable using a multimeter and handling simple electrical connections. Always shut off power and follow safety protocols.
Short answer: An AC sensor directly affects your HVAC system's performance. Often called a thermistor, this small electronic part monitors temperature at the evaporator coil and relays data to your system’s control board. When it fails, even slightly, it can trigger a cascade of inefficiencies. Expect short cycles, rising energy bills, or in worse cases, icing or compressor damage. That’s why testing and repairing or replacing it promptly is so critical.
Key Takeaways
- What it does: The AC thermistor (NTC) monitors evaporator coil temperature and feeds resistance readings to the control board to regulate cooling cycles.
- Failure symptoms: Short cycling, non-stop operation, uneven cooling, ice on coils, error codes (E1/sensor fault), and rising energy bills.
- DIY test: At ~77°F a healthy thermistor reads ~10kΩ; readings near 20kΩ+, below 5kΩ, or infinite/zero indicate failure.
- Replacement cost: Parts $15–$30 DIY; professional labor typically $100–$200 in Las Vegas.
What Does an AC Sensor Do?
The AC sensor, most commonly an NTC (Negative Temperature Coefficient) thermistor, measures the temperature of the evaporator coil. Changing resistance with temperature, it feeds real-time data to the control board, which then turns compressors or fans on and off to maintain your desired indoor temperature.
Without accurate readings, your AC can’t control its cycles efficiently. An erratic or failing sensor may misreport temperatures, triggering overheating, short cycling, or even continuous operation. That leads to premature wear on components, poor comfort control, and inflated energy bills. Not to mention, in some models, continuous cooling might cause coil freeze-up or shutdowns driven by system safety protocols.
Placement is everything. The sensor is typically installed just above the evaporator coil fins, about ¼ inch away, not touching the coil, to deliver accurate readings while avoiding direct contact. Misplacement or loose wiring means inaccurate feedback to your system, making the sensor a fine yet vital component.
Looking for additional quick fixes for cooling issues? Check out AC Not Cooling? Here Are 5 DIY Fixes You Should Try First.
Signs Your AC Sensor Is Not Working
Here are telltale warning signs that point toward a failing sensor:- Short Cycling: The system turns on and off repeatedly without ever reaching setpoint temperature. That inefficiency adds wear and eats up energy.
- Non-Stop Operation: The unit runs long past cooling demand, as if the system “thinks” the evaporator is always warm.
- Uneven Cooling: You may feel cold air near vents but warm zones deeper in the house, breaking down comfort zones.
- Ice Formation: If the sensor misreads coil temp as warm, the system may overcool, resulting in freezing on coils and airflow restriction.
- Error Codes: Modern units often flash codes like “E1,” “Sensor Fault,” or “Thermistor Error.” These are red flags that route directly to sensor diagnostics.
- Rising Energy Bills: At its most hidden level, a failing sensor runs your AC inefficiently, ramping energy use, and your bills.
Where Is the AC Sensor Located?
In most split-system setups, you'll find the sensor inside the indoor unit (air handler), mounted near the evaporator coil. Here’s how to locate it:- Open the front panel of the indoor air handler to expose the evaporator coil.
- Look for a small single probe, flat or slightly rounded, usually housed in plastic, about ¼ inch above the coil fins.
- This sensor connects via two slender wires that lead back to the control board or a harness.
How to Test an AC Sensor (Step‑by‑Step)
Testing your AC sensor with a multimeter is one of the most accessible HVAC diagnostics you can perform. Here’s how:- Cut the Power: Flip off the thermostat and the corresponding circuit breaker. Safety first, electricity and evaporator coils are never mix.
- Access the Air Handler: Remove the access panel or louvered cover to reach the evaporator coil.
- Identify the Sensor: Spot the small plastic probe with two wires near the coil.
- Disconnect It: Gently unplug the sensor from its connector. Don’t yank the wires, careful handling prevents damage.
- Set Meter to Ohms: Use a digital multimeter and set it to measure resistance.
- Measure at Room Temp (≈77 °F / 25 °C): Check the resistance; typical NTC sensors read around 10kΩ at this temp. Refer to your unit’s manual for exact spec range.
- Evaluate the Reading: If it’s significantly off, say, 20kΩ or more, or lower than 5kΩ, your sensor is likely failing. Readings nearing infinite resistance or zero indicate a total failure (open or short circuit).
- Cross-Check After Cold Exposure (Optional): If you're thorough, you can place the sensor briefly in a bag of ice water to see if the resistance rises, classic behavior for a working thermistor, but this is optional.
Quick DIY Fixes Before Calling a Pro
Before reaching for the wallet, try these quick, low-cost fixes, some only take a few minutes:- Reposition the Sensor: Ensure it’s securely mounted, not touching the coil fins. A misaligned probe throws off readings.
- Clean the Coil Area: Dust or mold can insulate the sensor and skew the temperature sample. Use a gentle brush or vacuum.
- Inspect Wiring and Connectors: Look for loose terminals, fraying, or corrosion. Tighten connections carefully or replace corroded terminals.
- Thermostat Placement Check: Make sure your indoor thermostat isn’t next to heat sources (sunlight, electronics). This misplacement may mislead the system into false temperature assumptions.
When to Replace the AC Sensor (and Costs)
If test results are out of spec, or nothing changes after the above DIY, replacement is your next move. Here’s what to know:- Out-of-Range Resistance: A reading far from manufacturer specs means it's time to replace.
- Visible Damage: Any signs of wire damage or corrosion invalidate reliability.
- Recurring Issues: If short cycling or sensor-related errors persist after cleaning or adjustment, replacing the sensor is often the only solution.
| Item | Typical Cost |
|---|---|
| Replacement Sensor | $15–$30 |
| DIY Installation | Free (just your time) |
| Professional Labor | $100–$200 |
Preventing Future AC Sensor Problems
After solving the issue, here’s how to keep it from coming back:- Annual HVAC Tune-Up: Technicians inspect sensor condition during normal annual service.
- Regular Coil Cleaning: A clean evaporator coil means clear airflow, and accurate sensor feedback.
- Seasonal Wiring Check: Inspect for loose connections or corrosion every season, especially after high humidity months.
- Avoid Forced Miswiring: Never “bypass” or jumper wiring in the system, it may damage other components or void warranties.
When to Call a Professional
Sometimes, calling a pro isn’t about what you can’t do, it’s about safety, peace of mind, and comprehensive system health. Contact a licensed HVAC tech if you notice:- Recurring coil icing even after cleaning
- Continuous operation regardless of thermostat setting
- Persistent error codes like “E1” or “Sensor Fault” after DIY efforts
- Inconsistent or no improvement despite replacement efforts
Related: Need a tech today? Book AC repair. Unsure if the unit is worth fixing? Use the repair-or-replace tool, or see AC repair services.
Book Your AC Sensor Repair Today
Skip the waiting and uncertainty, schedule with our licensed HVAC technicians today for fast, accurate service. Call us now at (702) 567-0707 or click below: Schedule Service Same-day local service across Las Vegas, your comfort is our priority.FAQs
How do I know if my AC sensor is bad? Look for signs like short cycling, ice formation on coils, or sensor fault codes like “E1.” A multimeter reading that’s far off from the spec is another giveaway. Can I replace an AC sensor myself? Yes, if you’re comfortable with basic tools and safety protocols, replacing an AC sensor is straightforward and cost-effective. What resistance should an AC thermistor read? Standard thermistors measure around 10kΩ at ~77 °F (25 °C). Refer to your unit’s manual for more accurate thresholds. How much does it cost to fix an AC sensor? Expect $15–$30 for the part itself. DIY saves you money, but professional AC repair labor typically ranges from $100–$200. Why is my AC freezing even after filter cleaning? A misaligned or faulty sensor might mislead your system into overcooling, no matter how clean your filter is. Proper sensor positioning helps avoid this. Can a bad sensor raise my electric bill? Absolutely. Incorrect sensor readings cause inefficient run cycles, spiking energy consumption and costing more on your bill.AC Sensor Not Working?
Don’t let a tiny thermistor derail your home comfort. This guide gives you the tools, tests, and techniques you need to troubleshoot, or know when to call in a pro. From diagnostics to repairs, your AC system can be restored to smart, reliable operation, without breaking the bank. Need help? We’re one call away, let’s fix this fast.Share This Page