
Short answer: A professional HVAC maintenance visit typically takes 60–90 minutes and covers refrigerant levels, electrical components, coil cleaning, drain lines, thermostat calibration, and a ductwork assessment. You get a written report at the end — no guesswork, no pressure.
Most homeowners schedule an HVAC maintenance visit and then stand in the hallway wondering what the technician is actually doing in there. That uncertainty is unnecessary. Here is an honest, step-by-step account of what happens from the moment we show up at your door to the moment we hand you the paperwork.
This is how we run every AC maintenance visit at The Cooling Company. The sequence may vary slightly based on your specific system, but the core checks are always the same.
Before the technician arrives
A few things make the visit go faster and get you more accurate results.
Replace your air filter if it is overdue. A fresh filter lets us measure true airflow rather than airflow restricted by a clogged one. Clear access to your indoor air handler — move boxes, bikes, or storage items away from the unit. If your thermostat is set to a schedule, make sure it is not mid-setback when we arrive, because we need the system to run during testing.
Write down anything unusual you have noticed: rooms that are not cooling evenly, higher-than-normal energy bills, any noises or odors. That context takes 30 seconds to share but can save 20 minutes of guesswork.
Step 1: The walkthrough and system history
We start with a brief conversation, not a sales pitch. We want to know the age of the system if you have it, when it was last serviced, and whether anything has changed — a renovation, new rooms, added appliances. If this is not your first visit with us, we pull up the notes from last time.
We walk the indoor unit, the outdoor unit, the thermostat, and any visible ductwork before touching anything. This takes about five minutes and frequently surfaces issues that no instrument would catch — a disconnected flex duct hanging in the attic, a condenser sitting in a corner with no clearance, a return grill blocked by furniture.
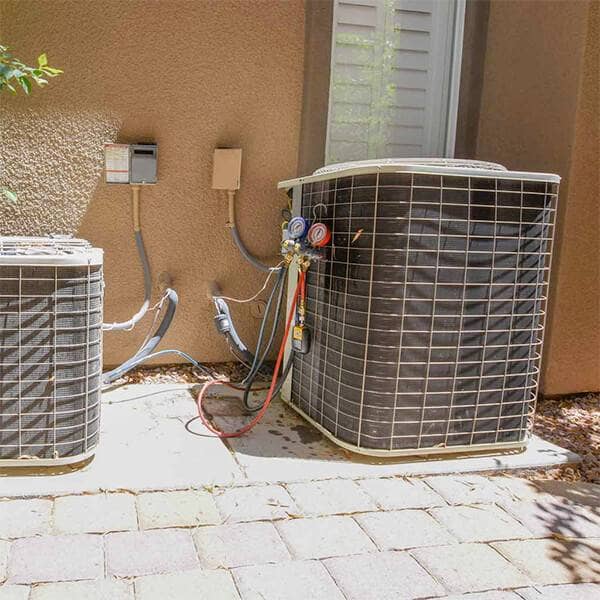
Step 2: Outdoor unit inspection
We check the outdoor condenser unit before we run the system. In Las Vegas, this check has extra weight because of two conditions that most of the country does not deal with at the same intensity.
Dust and debris accumulation. The Mojave Desert generates persistent fine particulate. Condenser coil fins get packed with dust faster here than in almost any other climate. Packed fins block the airflow the condenser needs to shed heat. A system working against restricted condenser airflow runs hotter, works harder, and loses efficiency. We brush or blow out the fins and, if needed, apply a coil cleaner to break down built-up grime.
UV and heat degradation. Las Vegas outdoor units sit in direct sun for hundreds of hours per year at temperatures that regularly exceed 110°F. We inspect the refrigerant line insulation (the foam jacket on the suction line) for cracking and UV breakdown. Deteriorated insulation causes the suction line to absorb heat from the surrounding air, reducing system efficiency and potentially causing the compressor to run hot. We also look at the electrical wiring conduit and any exposed components for sun damage.
We check the condenser fan blade for chips or cracks, test that the blade spins freely with no wobble, and confirm the fan motor is not vibrating excessively. We check the unit's feet and mounting pad for level — a unit that has shifted or sunk on one side can stress the refrigerant lines over time.
Step 3: Refrigerant check
Refrigerant is not a consumable. A properly sealed system does not lose refrigerant over time. If a system is low on refrigerant, that means there is a leak — and topping it off without finding and fixing the leak is a waste of your money.
We attach manifold gauges to the service ports and take suction-side and discharge-side pressure readings. We compare those pressures against the manufacturer's target for the current outdoor ambient temperature. We also measure the temperature split across the evaporator coil — the difference between the air entering the return and the air leaving the supply. A healthy system in Las Vegas should show a temperature split in the range of 14–22°F depending on conditions. A low split points toward a refrigerant issue, an airflow issue, or a dirty evaporator coil.
If pressures indicate the system is low, we look for the source. We check the evaporator coil, the service valves, the line set connections, and the condenser coil for oil residue — refrigerant leaks frequently carry compressor oil with them. If we find a leak, we tell you exactly where it is and what fixing it involves before we discuss refrigerant recharge.
Step 4: Electrical components
Electrical failures cause more no-cool calls than any other single category. Most of them are preventable.
Capacitors. The run capacitors on the compressor and condenser fan motor degrade over time, especially in Las Vegas heat. A weak capacitor causes motors to run at reduced torque, consuming more current and generating more heat. A failed capacitor means a non-starting compressor or fan motor. We use a capacitor tester to measure actual microfarad values against the rated specification — a capacitor reading below 90% of its rating is a candidate for replacement before it fails.
Contactor. The contactor is the heavy-duty electrical switch that sends power to the compressor and condenser fan when the thermostat calls for cooling. The contact points pit and burn over time from the repeated arcing that happens each time the system cycles. Pitted contacts cause voltage drop and heat. We inspect the contacts and test for voltage drop across the contactor under load.
Wiring and connections. Vibration loosens terminals. We check all accessible high-voltage and low-voltage connections for tightness and for signs of overheating — discolored insulation, melted terminal blocks, or burning smells at the connection points.
Amperage draw. We clamp an ammeter around the compressor and condenser fan motor leads and compare the measured draw against the motor's nameplate rating. A compressor drawing significantly above its rated amps is working harder than it should — often a sign of low refrigerant, a weak capacitor, or a dirty coil.
Step 5: Indoor unit and evaporator coil
The evaporator coil sits inside the air handler and is where the actual cooling happens. It is also where dust, skin cells, and biological material accumulate over time, forming an insulating layer that reduces heat transfer.
In Las Vegas, evaporator coil fouling is often accelerated by the dust that gets past filters — particularly after dust storms. We inspect the coil visually and, depending on access, with a flashlight or camera. A moderately dirty coil gets cleaned in place with a foaming coil cleaner. A heavily fouled coil may need more aggressive cleaning or, in severe cases, removal for cleaning.
We also inspect the blower wheel. A blower wheel with accumulated dust buildup moves significantly less air than a clean one while drawing the same current. Heavy buildup on the blower requires cleaning to restore airflow to spec.
We check the blower motor's amperage draw, verify the motor bearings are not dragging, and confirm the blower housing is properly sealed so it is not pulling in unconditioned attic air.
Step 6: Condensate drain line
Air conditioners pull significant amounts of moisture from the air. That moisture drips off the evaporator coil into a drain pan and exits the home through a condensate drain line. In Las Vegas, this line sees less volume than in more humid climates — but it still sees enough to grow algae and accumulate scale, especially in systems that have not been serviced in a few years.
A blocked condensate drain overflows the drain pan. That water goes somewhere — usually into the ceiling, the wall, or the air handler cabinet. The result is water damage, potential mold, and in some systems, a safety float switch that shuts the entire system down until the drain is cleared.
We flush the condensate drain line with a diluted treatment, confirm water flows freely through to the exterior, and check the safety float switch for proper function. If the line is heavily blocked, we use a wet/dry vacuum or compressed nitrogen to clear it. We also check the drain pan itself for cracks or standing water — a pan that holds water between cycles is a mold and corrosion concern.
Step 7: Thermostat calibration
A thermostat that reads two degrees warmer than actual room temperature makes your system run longer every single cycle. Over a Las Vegas summer, that adds up to real money on your NV Energy bill.
We verify that the thermostat is reading accurately by comparing it against a calibrated reference thermometer. We check that the heat and cool differentials (the dead bands that prevent short cycling) are set correctly for the system. We confirm the fan settings are on "Auto" rather than "On," since running the fan continuously in Auto mode saves energy and does not circulate unconditioned air when the system is not actively cooling.
If you have a smart thermostat, we confirm the location data is set correctly — a thermostat that thinks it is in Phoenix rather than Las Vegas may run a suboptimal schedule.
Step 8: Ductwork assessment
A full duct inspection is a separate service, but every maintenance visit includes a basic ductwork assessment. We look at what we can see: the connections at the air handler, the accessible duct runs in the garage or mechanical room, and the visible flex duct in the attic where accessible.
Leaky ducts are extremely common in Las Vegas. The combination of high attic temperatures (attics regularly exceed 150°F in summer) and negative pressure inside the supply ducts creates ideal conditions for joints to separate and flex duct to pull off its connections. Conditioned air leaking into a 150°F attic is immediately wasted, and unconditioned attic air leaking into the return side gets cooled at full cost before being pushed through the house.
We report what we observe — obvious disconnections, visible tears in flex duct, separated boot connections at ceiling registers — and recommend duct cleaning or duct sealing if we see signs of significant leakage. We do not oversell this. If the ducts look intact and airflow testing supports that assessment, we say so.
Step 9: System performance test
After completing individual component checks, we run the system through a full cycle with everything back together. We verify the system starts normally, that both the compressor and condenser fan are running, and that the supply air temperature is where it should be.
We take final readings — supply air temperature, return air temperature, outdoor ambient temperature, refrigerant pressures under load — and compare them against the baseline readings from the start of the visit and against expected performance for the system model at current conditions. We want to see that everything we found and corrected is reflected in improved readings.
The maintenance report: what it means
Before we leave, we give you a written maintenance report. Here is what to look for and what the readings mean.
Temperature split. This is the difference between your return air temperature and your supply air temperature. A reading of 14–22°F generally indicates the system is producing adequate cooling. A split below 14°F suggests insufficient cooling capacity — often low refrigerant or dirty coils. A split above 22°F with weak airflow suggests a restriction somewhere — often a dirty filter or blower.
Refrigerant pressures. The report will note measured suction and discharge pressures and how they compare to target. "Within specification" is what you want. A note that pressures are low should be followed by a specific finding about the leak location or a recommendation for leak detection.
Capacitor readings. The report will list measured microfarads versus rated microfarads for each capacitor tested. If any reading is below 90% of rated value, the report should note it as a recommendation.
Electrical findings. Any high amperage draws, loose connections, or pitted contacts will appear here with a severity rating. Minor issues are noted for monitoring. Issues that affect reliability or safety will be flagged clearly.
Next service recommendation. Most Las Vegas homes benefit from a spring tune-up before the summer heat and a fall check for the heating system. The report will note when we recommend the next visit based on what we found.
If the report recommends AC repair work, the technician should explain why — specifically what was found, what the consequence of deferring the repair is, and what the repair involves. A quality report gives you the information to make a real decision.
What NOT to expect
A maintenance visit is not a sales call. A legitimate technician is not there to manufacture urgency or invent problems.
You should not be told that you need a new system during a maintenance visit unless there is documented evidence — actual measured data showing the system is performing far below spec, a compressor with failed windings, or equipment that genuinely cannot be repaired. "This system is pretty old" is not a diagnosis. It is a setup for a sale.
You should not be pressured to make repair decisions on the spot. If we find something that needs attention, we tell you what it is, give you the numbers, explain what happens if it is deferred, and let you decide. Some repairs are urgent (a failed capacitor means no cooling). Some can wait (a slightly pitted contactor can be monitored until next service). We tell you which is which.
You should not be charged for refrigerant without a documented leak location and a documented starting charge level. Refrigerant does not disappear from a sealed system without a reason. Adding refrigerant to a leaking system without fixing the leak is a temporary and expensive non-solution.
How long does a maintenance visit take?
For a standard single-system residential home, plan on 60–90 minutes. Homes with two systems, heat pumps, or systems that require more cleaning will run longer — typically 90 minutes to two hours.
If the technician is rushing through in 30 minutes, key steps are being skipped. A thorough maintenance visit on a Las Vegas home takes time. Manifold gauges have to stabilize. Coil cleaner has to dwell and rinse. Amperage draws have to be measured under steady-state conditions, not a cold start.
Las Vegas-specific maintenance concerns
Las Vegas is not a typical climate for HVAC systems. A few conditions here demand specific attention that technicians from more moderate climates sometimes miss.
Extended cooling seasons. Las Vegas systems run hard from May through October — six months of near-continuous cooling load versus two or three months in most of the country. Components that fail once in a northern climate may fail twice per season here. Capacitors, contactors, and filters need more frequent attention.
Dust storms and monsoon debris. After a haboob or monsoon storm, condenser coils pick up significant debris. If you had a major dust storm since your last service, mention it. It changes what we prioritize.
Attic temperatures. Attic temps in Las Vegas regularly hit 150–160°F in summer. Any ductwork in the attic — and most Las Vegas homes have attic-mounted ductwork — is working against extreme heat. Duct insulation degrades faster, and duct connections see more thermal stress. We pay particular attention to attic duct integrity.
Hard water. Las Vegas water is among the hardest in the country. Condensate drain lines and drain pans accumulate mineral scale faster than in areas with softer water. Scale buildup accelerates drain line blockages. We factor this into how thoroughly we flush and treat the drain system.
For homeowners who want to stay ahead of these issues year-round, our maintenance plans cover both spring and fall visits with priority scheduling before peak seasons.
Frequently Asked Questions
How long does a professional HVAC maintenance visit take?
A thorough single-system visit takes 60–90 minutes. Homes with two systems or systems requiring significant cleaning run 90 minutes to two hours. If a technician completes a maintenance visit in 30 minutes, key steps were likely skipped.
What does a technician actually check during HVAC maintenance?
A complete maintenance visit covers refrigerant pressures and charge, electrical components (capacitors, contactor, wiring), condenser and evaporator coils, condensate drain line, thermostat calibration, blower motor and wheel, and a basic ductwork assessment. The visit ends with a performance test under load and a written report.
Do I need to be home during the maintenance visit?
Yes. The technician needs access to both the indoor and outdoor units. You or another adult should be present so the technician can ask about system history, walk through findings, and hand off the report at the end.
What should I do before the technician arrives?
Replace the air filter if it is overdue, clear access to the indoor air handler, and make a note of anything unusual you have noticed — uneven cooling, higher bills, odd noises, or odors. That information takes seconds to share and can save significant diagnostic time.
How often should I get HVAC maintenance in Las Vegas?
Las Vegas systems benefit from twice-yearly service — a spring tune-up before the cooling season and a fall check for the heating system. The extreme cooling load here is harder on components than most climates, so skipping spring service significantly raises the risk of a summer breakdown.
What happens if the technician finds a problem during maintenance?
If we find something that needs repair, we document it with specific measurements, explain what the issue means and what the risk of deferring is, and give you a repair estimate. We do not pressure same-day decisions. Some repairs are urgent; some can be monitored. We tell you the difference clearly.
What is included in a maintenance report?
A complete report includes measured refrigerant pressures, temperature split, capacitor readings versus rated values, electrical test results, coil condition notes, drain line status, and any repair recommendations with severity ratings. You should leave with enough information to understand the current state of your system.
Schedule a Maintenance Visit in Las Vegas
The Cooling Company performs thorough HVAC maintenance visits for homeowners throughout Las Vegas, Henderson, and North Las Vegas. Our technicians use calibrated instruments, provide written reports with real numbers, and do not manufacture urgency.
Call (702) 567-0707 to schedule a visit, or explore our maintenance plans for twice-yearly coverage with priority scheduling before peak season.
Need HVAC Service in Las Vegas?
The Cooling Company provides expert HVAC service throughout Las Vegas, Henderson, and North Las Vegas. Our licensed technicians deliver honest assessments, upfront pricing, and reliable results.
Call (702) 567-0707 or visit AC repair, AC maintenance, HVAC maintenance, or maintenance plans for details.